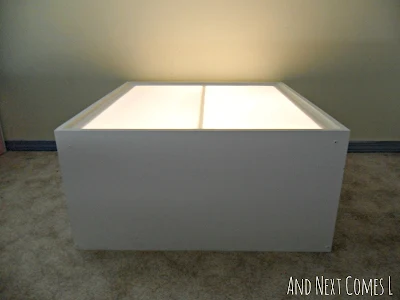
Here's how to make a DIY light table for kids from scratch!
This post contains affiliate links.
DIY Light Table Tutorial
This project was pretty straightforward and relatively easy to do. It only took us one afternoon to build it, but we had to wait for paint and caulking to dry. So it is more of a weekend project.
Okay, that's fine and dandy, but you want to know how much it costs, don't you?
Well, we made it for approximately $130, which if you've seen light panels like this that cost $190 or this one that costs $389 and are way smaller than ours, then you know that $130 is an incredible price point.
However, please note that we did not have to purchase wood for this project as we repurposed an old entertainment center and used scrap pieces of wood from previous projects. The screws and caulking we used for this project were also things we already had on hand. Regardless, you could probably make a similar table for under $200 if you have to purchase wood. The final price will really depend on how big you actually want the finished table to be. So browse the clear acrylic sheets at Home Depot to figure out what size you want to build yours.
As a disclaimer, I did not take pictures at the beginning despite my husband urging me. Why? Because I assumed, like most of our projects, that it wouldn't go as planned and we'd be required to make some changes along the way.
Well, it turns out this project was so easy. The hardest part was determining how to position the lights! As a result, I regret not listening to my husband (yes, I am admitting that he was right here!), but I have included a full text tutorial with some pictures of the later stages. If you have specific questions along the way, just post them in the comments.
Some other things to note about our light table:
- It is sturdy!
- There is lots of ventilation on the back and at the base of the table to prevent overheating.
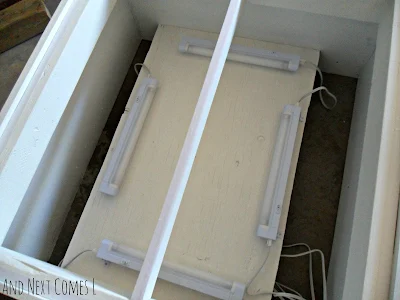
- The lights are attached to a piece of plywood that slides out for easy bulb replacement.
- There's an easy access on/off button on the side.
Ready to find out how we made it?
Materials Needed to Make a DIY Light Table
- 1 piece of clear high impact acrylic (ours was 28" x 30" x .093") - I paid $37.84 at Home Depot. We chose our sheet of acrylic first and built our table around it so that we would avoid having to order a custom size or cut the acrylic to size by ourselves. You can see a similar product here, although this one is larger and thicker than what we used.
- Parchment paper - It's used to diffuse the light.
- Double sided tape
- Interior paint - We had to buy paint to paint the trim in our house anyway so we maybe spent a total of $5 on paint for this project. We chose white, but you can use any color you'd like.
- Wall mounted power bar or surge protector to plug all the light fixtures into.
- 4 fluorescent lights - I paid $17.98 each from Home Depot. The lights were definitely the most expensive part of this project!
- Wood, MDF or plywood - I'm not a carpenter, but the final dimensions of our wood pieces are below in the tutorial.
- 2x4s (enough to build a frame for the sheet of acyrlic you use)
- White silicon kitchen/bath caulking
- Screws - Again, I'm not a carpenter so I don't know which kind we used. They were just ones we had on hand.
- Various power tools - We used a compound miter saw, a jigsaw, and a drill.
After staring at lights for what seemed like forever in Home Depot, we selected the following lights. They work perfectly! So I included a picture of the package for easy reference. You can also click here to see what lights we used.
You may find it helpful to engage little helpers in this project. Okay, they weren't really helpful per se, but K's pretty cute.
How to Make a DIY Light Table
For those of you who like simple instruction: build a box. You are now done! Hahaha...that is really all we did, but here's the more detailed step by step.1. Make a frame for the acrylic to sit on using 2x4s. The outside of the frame should be the exact same width and length as your piece of acrylic. So our acrylic was 28" x 30", which means the outside dimensions of the frame were also 28" x 30".
2. Using another piece of 2x4 or a thin piece of MDF, add a brace in the middle of the frame. Make sure it is level with what would be the top of the frame so that the acrylic will be level when it is set on top. We used a piece of MDF from the entertainment center. This brace will just add extra support to the acrylic in the event a child climbs on top because you know that's bound to happen! Both of my boys have been found sitting on the light table, so I'm so glad we added this support brace in.
3. Cut the wood for the sides and back. We used MDF pieces that were once the sides of the entertainment center. They worked perfectly! As you'll notice in the picture below, we did not use a solid piece for the back of the table. Instead, we used two braces. One brace is level with the top of all the sides. The lower brace is just slightly off the ground. This lower brace will be used to hold the base and lights of the table up.
The dimensions of the boards are as follows:
- Front: 29 5/16" L x 14 10/16" H x 10/16" W
- Sides: 30" L (so same length as the acrylic) x 14 10/16" H x 10/16" W
- Back braces: 29 5/16" L x 2 3/4" H x 10/16" W
4. Attach side pieces to the frame from step 1, leaving a small 10/16" lip. You can see in the picture below that we had the sides come up just slightly above the frame. The acrylic will just sit inside the outer edges and rest on the frame inside.
5. Decide where you want to attach your power bar. Use a jigsaw to cut an opening for the button. You'll notice that we had to add a small piece of 2x4 to adhere our power bar the way we wanted it. This 2x4 support is screwed onto the underside of the frame that we made from step 1.
6. Make a base for the lights to sit on. We used a sheet of plywood and a scrap 2x4 to do this part. The base of the table isn't as wide the the finished table because we wanted the table to be well ventilated to prevent overheating. The scrap 2x4 should be the same width as you cut the plywood. Attach the 2x4 to the inside of what would be the front of the table. It should be level with the lowest brace on the back of the table. This 2x4 will be used to hold the plywood (and lights) in place. You can see how wide our base is in the following picture.
8. Once dry, mount the lights to the plywood base. We played around with different light configurations and decided that making a rectangle with the lights was the optimal positioning. Some configurations left dark spots. Slide the plywood onto the 2x4 brace at the front and the lower brace on the back. Plug all the lights into the power bar. You can also tidy up the cords at this point with some zipties. We have all the cords running underneath the plywood base. Remember that the base is not screwed to the braces. Instead, it just rests on the braces. Doing so allows us to slide the plywood out when we need to replace the light bulbs.
9. Apply double sided tape to the top of the frame that you made in step 1, including on the middle brace. This will be used to temporarily hold the parchment paper in place until the acrylic sheet is placed on top.
10. Cut the parchment paper to size. I used two long pieces, overlapping them slightly on the middle brace. Be sure to pull the parchment paper as tight as possible so that there are minimal creases and wrinkles. You can always unstick and readjust the parchment paper until it's as smooth as possible since it hardly sticks to the double sided tape.
11. Place the acrylic sheet on top. To add a waterproof seal to your table, you can add some caulking along the edges of the acrylic.
12. Plug it in and play!
Looks awesome, right?! I am beyond thrilled with how it turned out and the boys love it. It was the perfect birthday present for them.


