Showing posts with label Xylophone. Show all posts

Tuesday, August 06, 2013

X is for Xylophone (The ABCs of Music for Kids)

Xylophone inspired music activities for kids.

X may be for xylophone, but I bet you didn't know there were so many different ways to play and learn using the xylophone!

1. Make your very own giant rainbow xylophone from recycled materials.  It's a perfect instrument for the backyard.


2. If you can sew, then you can make this simple xylophone quiet book page.  And trust me, it's an xylophone you will enjoy listening to over and over!


3. Have your toddler practice their color matching with this color matching xylophone game.


4. Draw out an xylophone hopscotch game and help your child learn how to spell their name.


5. Grab an xylophone and some dot stickers so you can introduce your child to music composition with this simple music composing activity.


6. Show your child the different parts of the xylophone and then try out this push pin xylophone activity.


7. Make a rainbow water xylophone.  It's a great way to exploring measuring and how it relates to sound, as well as a great way to explore color mixing.


 7. Listen to some music that features the xylophone.  I particularly enjoy this Super Mario Theme video, but probably because I am a video game nerd.  Okay, it is just plain fun too!  My boys also enjoyed it.


8. Try making xylophone tape resist art.


9. We're making magnetic music word cards to put on our freezer, which doubles as our magnet board.  So we made this xylophone card.  It's a perfect way to practice reading and spelling!


10. Explore math and science with this size comparison activity.


And if that's not enough, check out these other awesome xylophone activities:


Continue reading "X is for Xylophone (The ABCs of Music for Kids)"

Xylophone Tape Resist Art

The regular readers on my blog have probably noticed that we really enjoy doing tape resist art.  We have done music symbols, surfboards, a Canadian flag, and a Father's Day gift, all using this art method.  It's so simple to do, which is why I particularly enjoy it.  Anyway, I set up this xylophone tape resist art for the boys to do as part of our X is for Xylophone post.


I taped out an xylophone shape for each of my boys on some cardstock.  I then taped it to the table so it wouldn't move.


We used tempera paint for this tape resist art, but you are welcome to use any medium your child enjoys.  We have used primarily dot markers in the past for these types of art projects, but the boys were eager to use their paint brushes for this craft!  J preferred to paint "really fast!!" while K favored a more careful, gentle technique.


Regardless, the end result was fantastic!  Here's J's xylophone:


And here's K's finished xylophone:


Looking for more tape resist art projects?  Be sure to check out the tape resist art we have done using music symbolssurfboardsa Canadian flag, and a "We Love Dad" message.
Continue reading "Xylophone Tape Resist Art"

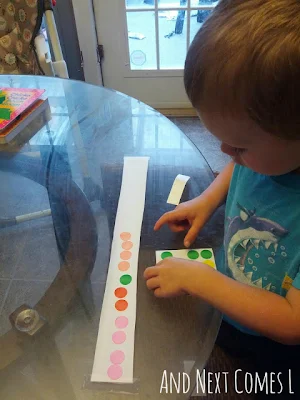
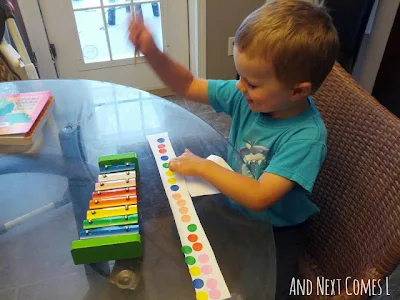
Composing Music With Stickers Using an Xylophone

Here's a great activity for introducing young children to composing music that's perfect for toddlers and up. 

Composing music with stickers from And Next Comes L

The brightly colored rainbow xylophones that are marketed towards kids just happen to be perfect for this music composition activity.  This activity would also be fun to do in the backyard on our homemade rainbow xylophone.  

I was inspired by this post on In Lieu of Preschool.  I simply used colored dot stickers, a long strip of easel paper, and an xylophone.  I had to color some stickers by hand to match the keys found on the xylophone.  I used permanent markers on white dot stickers, which only took a few minutes to do.

Composing music with stickers from And Next Comes L

I taped a strip of easel paper to the table, one for each of the boys.  I also gave each boy their own set of stickers.  They quickly went to work composing their little masterpieces.  I have mini-Mozarts in the making, I think!

K composing his song from And Next Comes L

K's finished song from And Next Comes L

J composing his song from And Next Comes L

J's song from And Next Comes L

Once their compositions were completed, it was time to play what they wrote.

K playing his song from And Next Comes L

J playing his song from And Next Comes L

J playing his song from And Next Comes L

J and K loved this activity, even though there was a small fight over who would play their song first!

So there you have it.  A simple way to introduce little ones to the process of music composition.  And it's also a great way to reinforce colors and even reading skills.
Continue reading "Composing Music With Stickers Using an Xylophone"

Using an Xylophone to Learn About Size Comparison

The shape of the xylophone is great for exploring math.  In particular, we used an xylophone to practice comparing sizes by sorting the bars of a paper xylophone from biggest to smallest.


I cut some construction paper into 1" wide strips of various lengths and then left this invitation for the boys to play with.


K had no interest in this activity, but J jumped right in and started sorting, using the xylophone as a guide.


It didn't take him long to get all the pieces sorted correctly.


Once all the pieces are correctly sorted, it's a perfect time to talk about xylophone bar length and its corresponding sound.  Have your child guess whether the longer bars would make high or low sounds.  Then have them play some notes on the xylophone to confirm whether or not they made the right hypothesis.  J didn't really care to participate along with this part of the activity and instead he found something else to do.  Like J usually does on a regular basis, he started to use the materials to form letters.

Continue reading "Using an Xylophone to Learn About Size Comparison"

Creating a Magnetic Music Word Wall

As part of The ABCs of Music for Kids series, we are building a magnetic music word wall.  Okay, it's more of a freezer than a wall per se...


I am hoping that the magnetic music word wall will be a great way to reinforce the names of the different music concepts that we will be exploring.  And anything with letters is always a hit with either of the boys.  Also, J is now sounding out words instead of just reading primarily by sight, so these cards will be used as a way to practice his reading.  Another bonus is that these cards will use up some of my cardstock scraps.  Wahoo!

I first wrote the word xylophone in pencil on a strip of cardstock and found the corresponding letters in my giant collection of foam alphabet stickers.


Then J matched the letter stickers to the letters on the card and stuck the stickers on.  So this activity was also great for fine motor practice.


I then glued some magnet strips to the back of the card so that it would stick to our freezer.


Immediately after I stuck the word to the freezer, J started using his alphabet magnets to spell out the word xylophone again.


See!


And then he insisted that I take a picture of his pluralized word.  So I figured I better blog about it too since he insisted!

Continue reading "Creating a Magnetic Music Word Wall"

Monday, August 05, 2013

Fine Motor Xylophone Activity

Together, the boys and I examined the different parts of the xylophone.  The first things they noticed were the bars of the xylophone and the mallets used to hit the bars.  I then pointed out the pins used to hold each bar in place, which lead me to create this great fine motor activity.


We used push pins for this activity.  Please note that both boys were under constant supervision during this activity.  If you don't feel comfortable with using push pins with your child, then please find an alternative that you are comfortable with.

Okay, now that that's off my chest...I can get to the actual activity itself.

Using a cereal box from our recycling, I cut out seven xylophone bars of various lengths.  I marked each end with an X (X is for xylophone after all!) on each individual xylophone bar using a marker.  I then arranged the bars in order on another cardboard box.


Of course, little hands couldn't resist the box of brightly colored unfamiliar objects.  K wanted them...like right now!


The boys worked together with little guidance from me, quickly pushing pins through the Xs on each bar.


Check out that fine motor movement!


I had to rotate the box part way through the activity because it kept caving when the boys put any amount of pressure on the pins.  Once I rotated the box, the boys found it much easier to push the pins in.  They quickly finished putting the pins of the xylophone in, which resulted in this:


J lost interest after completing it, but K, however, proceeded to pull out all the pins and do the activity over and over multiple times.  Then K and I spent some time pushing pins randomly around the box.  He had a blast!
Continue reading "Fine Motor Xylophone Activity"

Friday, August 02, 2013

Learn Your Name With Xylophone Hopscotch

Have you ever realized that the shape of the xylophone lends itself to a fun hopscotch game?  

No, you didn't?!  

Well, that's okay, because you do now!  Of course, that wasn't enough for me.  I had to toss in some name learning as well, which leads me to this...


To play xylophone hopscotch, draw an xylophone bar for each letter in your child's name using sidewalk chalk.  Keep in mind that each bar should get shorter and shorter as you go along.  J was very excited to see my drawing giant xylophones on the sidewalk.

Here's the one I did for J.


And here's the one I did for K.


Then it's time to hop away!  Encourage your child to identify the letters as they hop from xylophone bar to xylophone bar.


And that's it: an active way to help your child learn how to spell their name, but with a musical twist!

Be sure to check out these other fun outdoor music related activities: Homemade Rainbow Xylophone or Giant Chalk Keyboard.
Continue reading "Learn Your Name With Xylophone Hopscotch"