Showing posts with label Silhouette Cameo. Show all posts

Saturday, August 09, 2014

Our Playroom: Imaginary Play Area

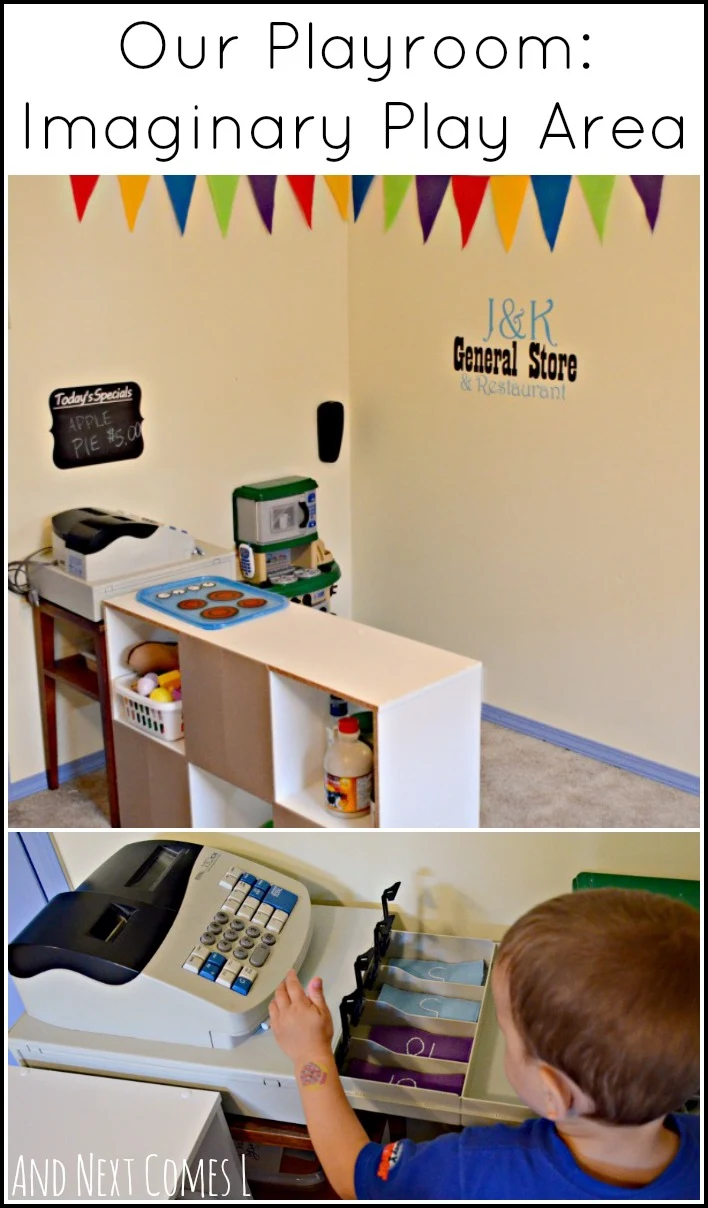
Our imaginary play area of our playroom has been a work in progress for quite some time, but I am thrilled to finally show it off! It acts as a general store, a restaurant, a kitchen, or even a post office! I designed this space with two year old K in mind. He loves to cook, both pretend and real, and I am hoping to foster that love even further. So far, it's working. Both J and K love to make smoothies and other delights, such as cheese tea, in this play area. They have spent countless hours playing (and making a mess!) in this little corner of our playroom.

Playroom idea: imaginary play area with kitchen, homemade felt food, real cash register, and more! from And Next Comes L

This post contains affiliate links for your convenience.

This space is filled with wonderful little details from homemade goodies to real machines and containers.

Playroom idea: imaginary play area with kitchen, homemade felt food, real cash register, and more! from And Next Comes L

Here's a list of things you can find in our imaginary play area:
  • Green Toys dish set
  • Royal brand cash register - It's a hand-me-down cash register given to us by my parents.
  • Cordless telephone - Our phone from our old house.
  • Small play kitchen - A garage sale find for $5!
  • Plastic play food - Random bits given to us by a friend.
  • Homemade felt oven mitts from our pack and play stove
  • Felt play food
  • Recipe book (in French) from Blendtec blender
  • Glass spice jars with labels on the lid
  • Measuring spoons, measuring cups, wooden spoons, and various other utensils - Most are purchased from the dollar store.
  • Stovetop lid from our pack and play stove
  • Old wallets filled with expired cards, fake credit cards, and used gift cards
  • A basket with envelopes and small packages
  • Empty recyclables

My boys especially love the real containers that are used in their play area. It's a great way for them to practice fine motor skills (opening and closing containers), while exposing them to environmental print. Pretty much every recipe they cook has a squirt of mustard or a generous serving of maple syrup! I've eaten many bizarre combinations!

Using recycled containers in imaginary play area in kids' playroom from And Next Comes L

I love the personalized details on the wall, such as the DIY felt bunting. I also cut out some vinyl using my Silhouette Cameo to make the sign below. I used chalkboard vinyl to create the mini chalkboard with "Today's Specials" that you can see above the cash register (see photos at the top of this post). The boys, especially J, love to write their daily specials with chalk. That's where cheese tea was once featured.

DIY vinyl decals for kids' playroom made with Silhouette Cameo from And Next Comes L

Like I said, this imaginary play area has been a huge hit with the boys for cooking...

Pretend play in the playroom from And Next Comes L

Or running a store...

Pretend play in the playroom with a real cash register from And Next Comes L

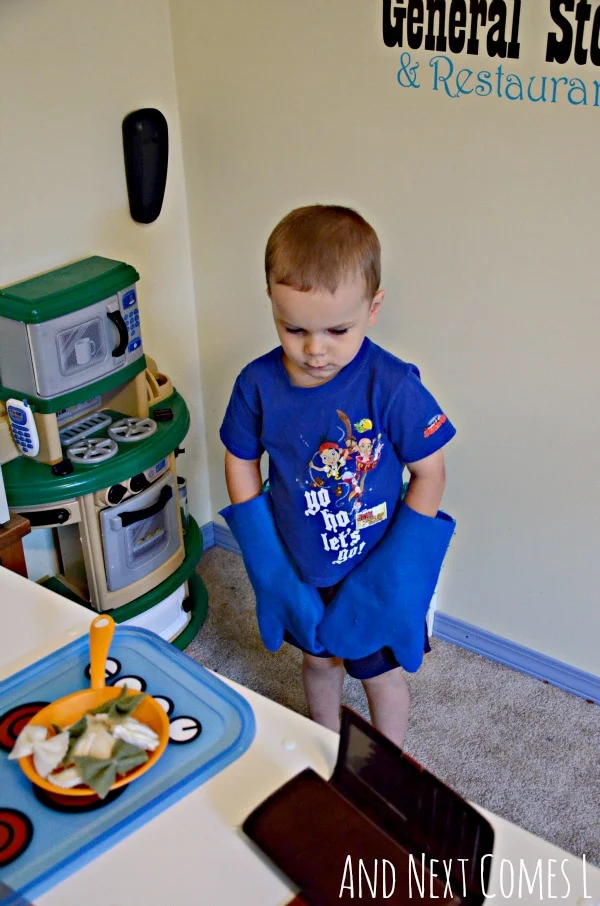
Or practicing real life skills. Don't forget those oven mitts!

Pretend play in the playroom from And Next Comes L

Looking for more playroom inspiration? Check out these other ideas:


Or browse my Play Spaces for Kids board on Pinterest for even more ideas!

Playroom idea: imaginary play area with kitchen, homemade felt food, real cash register, and more! from And Next Comes L
Continue reading "Our Playroom: Imaginary Play Area"

Saturday, May 03, 2014

Personalized Nintendo Inspired Wedding Gift

The other night I was browsing through old photographs.  I stumbled upon a picture of a wedding gift that I made for two high school friends that got married last year.  I so wish that I took better pictures of the finished gift, but considering that I finished making it about 30 minutes before the wedding reception, a quick picture from my phone is better than nothing.  But, honestly, the picture does not do this personalized wedding gift any justice.

I brainstormed for weeks leading up to the wedding for the perfect homemade wedding gift.  I had no inspiration.  Then my husband mentioned something about old school Nintendo and a light bulb went off.  You see, the groom is a huge video game fan.  So what's better than a wedding gift inspired by the classic Nintendo controller?!  I know!  A wedding gift that also cost me next to nothing to make, but shhh, that will be our little secret.

The bride's and groom's names were perfect for the Nintendo controller since their names both start with S just like the start and select buttons.  And the A and B button?  They became the date of their wedding.  Then I replaced the Nintendo name with their last name.  

Nintendo inspired personalized wedding gift for video game lovers from And Next Comes L

This post contains affiliate links for your convenience.

Perhaps my favorite detail is the cord for hanging the finished wall hanging.  If you were like me as a kid, you often wrapped the cord of the controller around the controller itself.  That is why I decided to wrap it around each edge of the finished wall hanging versus just attaching it to the back.  To make the cord look even more realistic, my husband had a brilliant idea.  We happen to have lots of old computer mice kicking around, so he cut the cord off one of the mice for me to use.  It makes the gift look even more authentic.

The gift itself was pretty straightforward to make.  Although I do wish I was able to lay the vinyl straighter.  However, the pressing time deadline did not allow for perfection.  Regardless, the finished product is so awesome.  It is easily one of the most unique things that I have made using my Silhouette Cameo.

To make the personalized wedding gift, I used:

Basically, I painted the wood with light gray acrylic paint.  I then painted some darker gray sections in the middle.  I then laid the vinyl pieces on top and as I mentioned, somewhat crookedly.  Then I sealed the entire project with  Mod Podge.

The most tedious part was designing the actual vinyl pattern in my Silhouette Studio Designer Edition.  Considering I was able to whip this gift together between the ceremony and the reception, I think that it turned out pretty fab.

Don't forget to check out my other Silhouette home decor ideas: 

Continue reading "Personalized Nintendo Inspired Wedding Gift"

Thursday, April 17, 2014

Homemade DIY LEGO Table Top for Kids

Looking for homemade LEGO table ideas? Here's how to make your own DIY LEGO table top (that's also portable).

When I first built the light table, I knew that I wanted to make it versatile. Something that would grow with my boys and and their interests. Something perhaps with different activity table tops so it could be converted into different things besides a light table.

One of the first things I created was a double sided table top. One side has roads to drive cars on. And the other side is well, our DIY LEGO table. The one you see below. And the one you're obviously here to read about...

Since these different table tops are removable, that means our LEGO table can quickly become a portable DIY LEGO table. Wahoo, awesome, right?

The kids can take it off the table and use it on the floor. Or play with it in the sunroom. Or take it to their bedroom to play. Bonus: this homemade LEGO table top can slide right underneath their beds for storage, even with some taller creations on it. That's obviously incredibly important.

Okay enough jibber-jabber. You just want to know how to make your own LEGO Duplo building table so let's get to the tutorial.

DIY LEGO table top tutorial and instructions


DIY LEGO Table: Here's What You'll Need

First up, let's talk materials and supplies. Here's what I used to make the Lego building table:

  • 1/4" thick hardboard - The size you need will depend on how big you want to make your lego table. Ours was cut to fit on top of our light table.
  • Silhouette Cameo (completely optional, you could always skip the quotes or paint your own)
  • Vinyl (only needed if you are using a Silhouette Cameo to cut out some quotes)
DIY LEGO Duplo play table top

How to Build Your Own DIY LEGO Play Table

I arranged the LEGO table baseplates on the hardboard until I found the layout that worked best for the size of my table. Then I marked the edges with a pencil.  

Next step is to remove the Lego baseplates so you can paint the table. I gave it two generous coats of white acrylic paint. Obviously letting it dry completely in between coats and all that jazz.

The next step is to glue the baseplates to the painted table. But before you go ahead and glue anything, there's one really important thing you need to know. 

Super Important Tip: When gluing LEGO baseplates, you have to leave a small gap between the baseplates in order for Duplo or regular Lego to fit on more than one baseplate at a time. Put them too close together - or too far apart! - and you won't be able to build on two baseplates at once. 

What I did was attach two baseplates together with some Duplo while I glued the baseplates down. Doing so ensured that I had the correct spacing between baseplates.

Okay now that you know about this important tip, you can go ahead and glue the LEGO baseplates to the table. Be sure to press them down firmly. They will glue super quick!

After the baseplates were all glued down, I was unhappy with the amount of white space there was. I decided to pretty it up with some inspirational quotes cut from vinyl. I used the quotes, "Imagination will take you everywhere," by Albert Einstein and "You can't use up creativity. The more you use, the more you have," by Maya Angelou.  I made the key words (imagination, everywhere, and creativity) in bold, bright vinyl colors. This step is completely optional.

To protect the painted surface of the finished activity table, I applied a couple coats of Mod Podge. To hold everything in, kind of like Spanx.

And that's it! Now you can revel in its beauty. Or, you know, like let your kids play with it or something because your LEGO Duplo play table is now officially ready for play.

Portable DIY lego table top instructions & tutorial

Our Finished DIY LEGO Table Top

Like I mentioned earlier, this table top is removable which means sometimes we play with it on the floor. That's what's great about making a custom LEGO playing table. There's no one way to make your own lego table. You can create them however you want! You can make it a permanent table of its own or make it more portable like we did.

Homemade LEGO table with LEGO Duplo bricks

LEGO Duplo on a DIY LEGO duplo activity table top

Building with Duplo on a custom LEGO playing table top

Other times we put this LEGO Duplo activity table on top of light table in our playroom. It really depends on our mood and what the kids want to do. And I like that we have the option and flexibility to move it around. I also like that we can flip it over and play with the cars activity table that's on the other side.

Homemade DIY LEGO table

Homemade DIY LEGO table

I really love how our portable DIY LEGO table top turned out! It's one of three different table tops we made for our DIY light table. The other two are linked below.

Other DIY Kids Activity Table Ideas

DIY Road & Cars Activity Table Top


Continue reading "Homemade DIY LEGO Table Top for Kids"

Saturday, April 12, 2014

Lovebirds Etched Mirror

I am a bit excited, and a wee bit nervous all at the same time, to branch out from the typical kids activities that you find on my blog to share something different.  I really do want my blog to reflect me and since crafting makes me happy, I thought it was time to showcase some of my other ideas.  I already mentioned here that I was planning on introducing some of my other crafts on a very occasional basis.  Besides, not everything is about the kids around here.  Okay, maybe it is like 99% of the time...

This post contains affiliate links for your convenience.

Today's post also marks my 300th post!  300 - what a milestone!  So today is as good a day as any to share some of my DIY home decor ideas instead of the usual light table activity or quiet book page or sensory activity.  And if you've been following along for awhile, then you may have noticed my love for my Silhouette Cameo with these various projects.  One of the first projects that I did with my Cameo was this beautiful lovebirds silhouette etched mirror.

DIY lovebirds etched mirror from And Next Comes L

My mom, who is a ceramic artist, made us a beautiful custom mirror for our main floor bathroom.  It replaced this very plain dark brown framed mirror.  I decided to hang on to it, but not entirely sure what to do with it.  

Eventually I came across this lovebird wallpaper and fell in love with it.  I just knew that it would look amazing as an etched mirror.  One problem though.  I had never etched anything in my life.  I was hoping that my Cameo would make it a breeze.  It totally was!  Seriously, the Cameo is an amazing product for anyone that loves to craft.

Thankfully I had most of the supplies from the Silhouette etching starter kit already on hand from another Silhouette starter kit.  So I ordered myself some etching cream to try this process out.

I popped the lovebird image in my Silhouette Studio program and used some vinyl to make a stencil for my mirror.  Once the stencil was on the mirror, it was only a matter of applying some etching cream, washing it off, and removing the vinyl.  Then I was left with this gorgeous upcycled mirror.

DIY lovebirds etched mirror from And Next Comes L

The finished mirror now hangs in our back entryway.  And I absolutely adore it.  It is the perfect compliment to what was once a very plain wall.

DIY lovebirds etched mirror from And Next Comes L
Continue reading "Lovebirds Etched Mirror"

Saturday, January 04, 2014

DIY Children's Art Display

Wondering how to display your children's artwork at home? Try making this DIY children's art display in your playroom using a simple frame and some clothesline.

When my kids make a piece of art - even if it's just scribbles on a page - they are so excited and so proud to show it off to me.

To showcase their artwork at home, my husband and I made this DIY kids art display using some scrap wood and some materials from the dollar store. The kids now have their own personal art gallery and they loving having their artwork and drawings on display in our playroom.

So if you are looking for a creative way to display your children's art, then you're going to love this tutorial for making a children's art display.

Display children's artwork with this DIY kids art display

What You'll Need to Make this DIY Children's Art Display

I had been brainstorming this art display idea for months, but it finally came into fruition when my husband (perhaps mistakenly?) asked me, "Are there any projects you want to get done before I return to work?"

So I convinced him to pull out the saw, make a giant picture frame, and mount it to the wall. And I'm thrilled with the end result.

Here's what you'll need to make one of your own:

  • Wood window casings (dimensions will depend on how big or small you want to make yours) - ours were leftovers from when our new windows were installed
  • Two pieces of string
  • Acrylic paint (optional)

How to display children's artwork at home

How to Make the DIY Art Gallery for Displaying Children's Artwork at Home

To make the frame for the art gallery, we used our leftover window casings from when our new windows were installed last spring. They're the same window casings that we used to make our giant rainbow xylophone and to build giant letters outdoors with. So I was happy to put them to a more permanent use. 

The interior dimensions of our frame are 60" w x 32" h.

We attached two pieces of string to the backside of the frames with a staple gun before attaching the frame to the wall.

Once the frame was finished, I used my Silhouette Cameo to cut out the sign for our art gallery (Robson Fine Art Gallery) from black vinyl. You can now download the Silhouette Studio file for free and change the wording accordingly.

Using wood clothespins, I put some of the boys' artwork up for display, including this bumblebee craft.

It looked great, but we felt that it was missing something. Then my husband had a great idea. He commented that when he looked at the art gallery, it looked like he was looking at a clothesline through a window. Then he proposed that we paint the interior of the frame like a sky with clouds so that it would really look like a window.

Armed with some sky blue and white acrylic paints, I painted a simple sky scene with clouds. It turned out perfect! I love the punch of color behind the kids' art. Plus, it brightens up our playroom. Since our playroom is in the basement, the room can look quite dim at the best of times. This art gallery is just what this wall needed to come to life. And the playroom has brightened up even more since we built the DIY Super Mario climbing wall.

Framed clothesline display for children's art

You may have noticed our Montessori-inspired crayon color sorters just below our art gallery. I followed this tutorial for upcycled Montessori style crayon holders from Happiness is Homemade, which I found via The Kavanaugh Report. I didn't have tin cans so I made our crayon sorters from plastic individual applesauce containers. And goodness knows, I have tons of those laying around (see here and here)! I just lathered them in a few coats of acrylic paint and a coat of Mod Podge.

And that's how we'll be displaying our recent arts and crafts from now on!  

Remember, if you have a Silhouette Cameo, then you can download the Silhouette Studio file for the vinyl lettering for free.

Other Ideas You'll Love


How to display children's art and drawings at home - find out how to make a DIY art gallery wall for kids with this tutorial
Continue reading "DIY Children's Art Display"

Tuesday, October 29, 2013

Car Dashboard: DIY Upcycled Sensory Board

We've been redoing our play room ever since we built the light table, including a toy purge that was long overdue.  So we ended up with a bit of a blank space on one wall and I was looking for something to put there.  I decided that it would be a great  space for a large sensory board of some kind, but I just didn't know what.  

Then inspiration struck.

I decided to make this car themed sensory board for kids by upcycling various items from around our house.

DIY upcycled car dashboard sensory board for kids - great for imaginative play from And Next Comes L

This post contains affiliate links.

The Inspiration for our DIY Sensory Board

It started with a hideously faded yellow plastic steering wheel similar to this one.  

A neighbor down the street from us was cleaning up their backyard toys, giving a bunch away for free.  Among the toys for free were some swings and a steering wheel that were previously part of a play structure.  As soon as I saw the steering wheel, I wanted to mount it in the playroom, which, ultimately, led me to come up with this car dashboard sensory board.  

As a side note, we also took the swings (one of which hangs in our basement and the others outside on the play structure our other neighbor lent to us).

How to Make a Car Themed Sensory Board for Kids

This project wasn't overly time consuming nor did it cost us a lot of money.  I paid $2.25 for the two round tap lights, $1 for the mirror, approximately $2-3 on hardware like nuts, and $5 on a can of glossy black spray paint.  Everything else used for this project was either upcycled from something else or we already had it on hand.

The main board was part of the same entertainment center that we built our light table from.  We didn't have to cut it as it was already the perfect length.  Score!

We (and by we, I mean my wonderful husband) used a jigsaw to cut the gear shift section (pictures below).  After making those cuts, he painted the entire board, as well as a smaller piece of wood and a wood handle, white using the paint we had leftover from our light table.

He also spray painted the steering wheel black.  Then it was time for assembly! 

The center of the sensory board features a gear shift and a stereo.  A couple of years ago we installed a new CD player in our car, so we attached our old one to the sensory board.  The boys love that they get to play with real buttons!

The knob for the gear shift is from an old elliptical machine that broke a few years ago.  It is attached with a nut and some washers and slides easily through the slots that my husband cut.  The numbers on the gear shift are cut from black vinyl using my Silhouette Cameo (PS: that thing is awesome!).

Close up of upcycled DIY car dashboard sensory board for kids from And Next Comes L

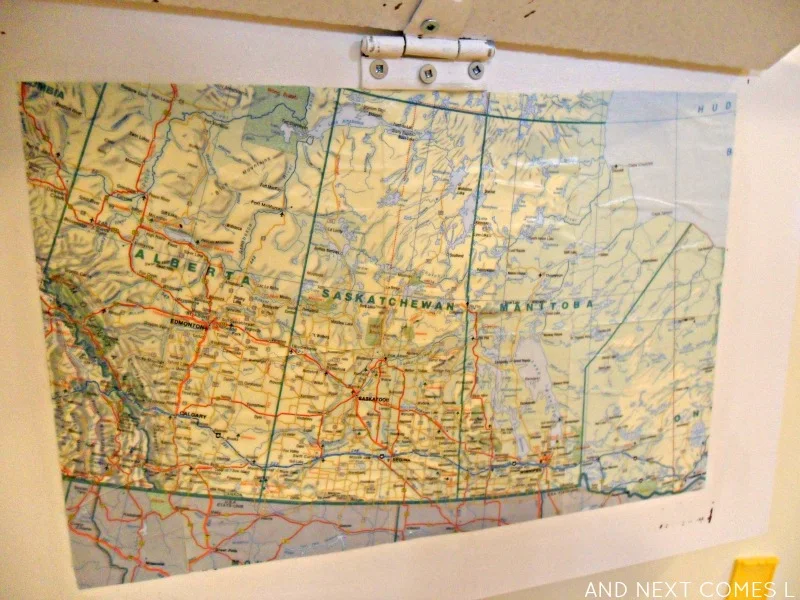
On the right side of the dashboard is the glove box or in our case, the glove flap.  Lift up the door to reveal an old map of the Canadian prairies mod podged to the dashboard.  Again, the door was made with recycled wood and the hinge is one that we had on hand.  I wish that we had two hinges so that the door would open better, but alas, we had one, so we used one.  The cool thing about this part is that within two days, K not only learned the name of where we live, but can point it out on the map.  He also tries to point out where my parents live, but points to the wrong area.  Ah well, he's only just turned 2!

Map in the glove box of a DIY car dashboard sensory board for kids from And Next Comes L

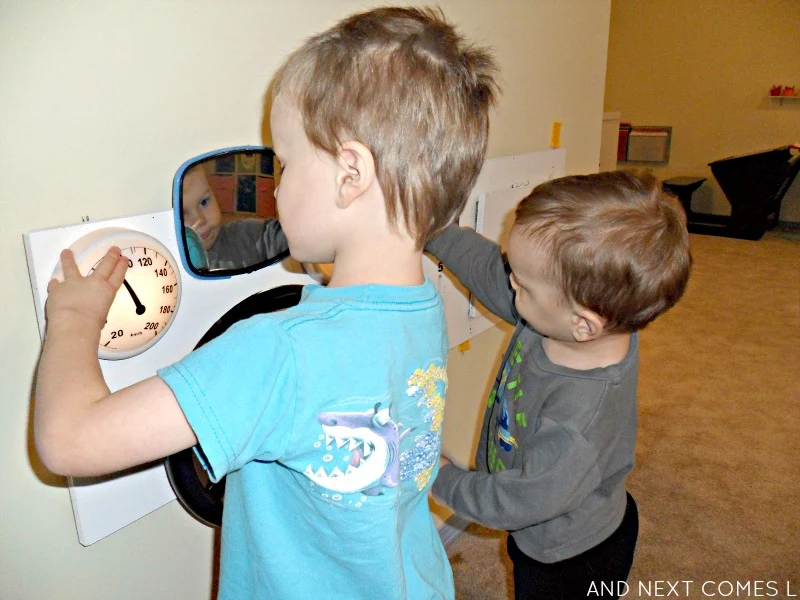
By far the coolest feature, in my opinion anyways, are the gauges for the dashboard.  I purchased two round tap lights from The Dollar Tree.  Then I used black vinyl and my Cameo to make the features for a speedometer and gas gauge.  The gas gauge was simple, but I had a lot more trouble making and sticking the vinyl down for the speedometer.  I think that painting or using a permanent marker would be a good substitute.  Regardless, they turned out amazing!  And they light up when pressed.

Gauge on a DIY car dashboard sensory board for kids from And Next Comes L

Gauge on a DIY car dashboard sensory board for kids from And Next Comes L

Between the lights, we mounted a mirror.  This mirror caused many problems.  It was originally hung as a rear view mirror closer to the stereo by mounting it through the handle.  However, J was admiring himself in the mirror and pulling on it.  Needless to say, the handle snapped off and he smacked himself in the face with the mirror.  So we looked for a new way to hang it.  We popped out the mirror, screwed the plastic backing to the board, popped the mirror back in, and voila!  Okay, not voila because the mirror ended up cracking while my husband put it back in.  Nothing a bit of clear tape didn't fix!  

DIY upcycled car dashboard sensory board for kids - great for imaginative play from And Next Comes L

We mounted the newly painted steering wheel below the mirror.  Just behind the steering wheel is a small odometer made from black vinyl (you can sort of see it in the picture above).  The numbers on the odometer are 0102013, which stands for the month and year it was made.

Here's an overview of the dashboard when the lights are on.

Spark the imagination with this DIY upcycled car dashboard sensory board for kids from And Next Comes L

And here's a picture of the boys enjoying their new "car."

Playing with a DIY upcycled car dashboard sensory board for kids from And Next Comes L

Other Ideas You'll Love


Build an upcycled car dashboard sensory board for kids from And Next Comes L
Continue reading "Car Dashboard: DIY Upcycled Sensory Board"

Friday, August 30, 2013

Thursday, August 15, 2013

Pack and Play Stove {Mini DIY Portable Kitchen for Kids}

You know how kids enjoy playing with stuff in the kitchen?  

Well, here's a solution: their very own portable kitchen!  It uses real kitchen utensils, cost less than $10 to make, and has homemade oven mitts.  Sweet, right?

Ready to find out how to make a DIY pack and play stove for kids?

Tutorial for making a DIY portable play kitchen for kids from And Next Comes L

This post contains affiliate links.

How to Make a Portable Play Kitchen for Kids

Now, I'm going to be up front and tell you that this idea was not mine.

I know...I know...

Instead, this project was a copycat of this pack-n-go kids play stove, which was inspired by this kids play stove.  However, like most things that I try from Pinterest, I put my own spin on it somewhere, as you will see.

So I headed to the dollar store, hoping to find everything that I needed to make my own play stove for under $10.  I purchased the following items:

  • Plastic container with lid - The largest size that I could find was 15 cups.
  • Package of four green melamine bowls, one of which was smashed to smithereens by K.
  • Tongs
  • Package of three wooden spoons of various sizes
  • Set of measuring cups - They double up as pots and pans for the stove.
  • Set of measuring spoons
My final price?  $9.07 including the taxes!  Wahoo!

I already had red, black, and white vinyl on hand.  I used my handy-dandy Silhouette Cameo to cut out the shapes that I needed.  I just designed my own shapes. You could also try the template found here.  Then I stuck the vinyl on the lid of the plastic container. 

I filled the plastic container with the various kitchen utensils that I picked up from the dollar store. You will notice that my little something special was a pair of homemade felt oven mitts.

Oven mitts were a must for me since K loves to steal them from the kitchen and clap his hands while wearing them.  To make the oven mitts, I simply traced my oven mitts onto some felt, cut it, and then sewed it using my machine.  It took literally five minutes to make them.

Pack and play stove mini play kitchen for kids from And Next Comes L

To start cooking, place the lid on the container and use the items that are stored inside the container to cook with.

Playing with a portable play kitchen for kids from And Next Comes L

Playing with a portable play kitchen for kids from And Next Comes L

Playing with a portable play kitchen for kids from And Next Comes L

I am so pleased with how this play stove turned out.  K especially loves it and plays with it constantly.  He really enjoys the oven mitts, the tongs, and the measuring spoons.

 Other Ideas You'll Love


How to make a DIY portable play kitchen for kids for $10 or less from And Next Comes L
Continue reading "Pack and Play Stove {Mini DIY Portable Kitchen for Kids}"

Wednesday, July 10, 2013

Alphabet Hands Obstacle Course & Scavenger Hunt

I found this awesome high five obstacle course on Lalymom, knowing full well that the boys would love this activity.  However, I figured the handprints wouldn't be quite enough to keep them engaged.  So I thought about what the love.  They love letters.  Therefore, it made sense to write letters on these hands.  That's how the alphabet hands were born!


This post contains affiliate links for your convenience.

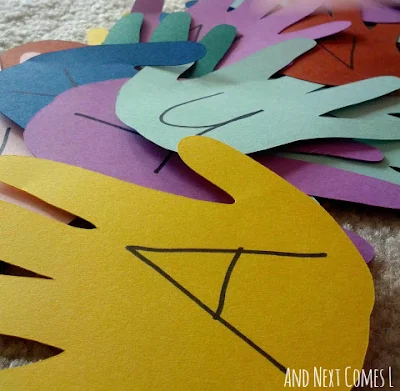
I cut out 26 hands from card stock using my Silhouette Cameo with the help of my trusty assistant, J.  I used about six different colors.  Once all the hands were cut out, I wrote a letter on each one.  I put an uppercase letter on one side and the corresponding lowercase letter on the other aide, which means we could do the following activity for uppercase letters or lowercase letters.  It's like two activities in one!


What if you don't have a digital cutting tool?  Print off a hand image and cut out 26.  Or trace your child's hand 26 times and make it into craft time.  Don't want to cut out 26 hands?  Use foam shapes from the dollar store instead.

If you have a laminator, I would definitely laminate them to avoid causalities like below...And yes, it HAD to have a band-aid.


While K was napping, J helped me tape each of the hands to random spots on the wall throughout our dining room, piano room, and front entryway.  I had no idea he would have that much fun putting the hands up, but he did.  


Once we were done scattering them around, it was time to play high five with the alphabet hands.  This activity really was an obstacle course as I still hadn't tidied up the toys in the dining room from when I taught my last piano lesson...like three weeks ago.  Ahem.

So off J went, starting with A, moving to B, and working his way through the entire alphabet.  He had to jump to high five some of the letters, which was an added energy burner. 


I was hoping to keep the hands up for when K woke up, but once J ran and high fived all the hands, he wanted to play with them on the floor.  So he took the hands down, by himself, once again going in alphabetical order.  Then he spent a good hour or two just playing with the hands themselves.


Don't worry.  K didn't get left out completely!  A few days later, it was absolutely pouring outside, so I set up the alphabet hands again so that I could let K have a turn.  And just as a side note, they are still hanging up, almost a week later, and the boys will often high five letters as they pass them.


Looking for more fun alphabet learning activities?  You can see all of our alphabet activities here, including our Outdoor Alphabet Scavenger Hunt.
Continue reading "Alphabet Hands Obstacle Course & Scavenger Hunt"