Showing posts with label Sewing Projects. Show all posts

June 30, 2020

How to Make a Homemade Taco Swing

A tutorial for making your own taco swing for kids. This DIY sensory swing is pretty easy to make and tons of fun for the kids!

I made a homemade taco swing for my boys for Christmas and I have been so excited to share the tutorial with you. 

The actual sewing and assembly of this swing went so smoothly that I actually impressed myself by how well it came together...haha 

From start to finish, this DIY taco swing took me about a hour to make. And I was hoping to do it for under $50. Well, not only does the final product look and work amazing, but I made it for about $25. 

How much does a store bought one cost, you ask? 

Only a whopping $175-300! 

So yeah...how about that tutorial then?

Homemade taco swing tutorial - how to make a sensory swing for kids from scratch!

Important Safety Precautions & Reminders for DIY Sensory Swings for Kids

I know some of these seem obvious, but I will state these reminders clearly.

  • Do not use stretchy fabric for this swing. 
  • Make sure the thread strength matches the fabric used. Also, make sure you use the appropriate needle on the sewing machine!
  • Always test homemade swings first before letting children play with them.  
  • Do not leave children unattended in swings. 
  • Put swings away when not in use. 
  • Make sure the swing is in a clear, unobstructed space. 
  • I am not responsible for injuries or damage pertaining to or caused by this homemade swing. 
  • Please use at your own risk.

Taco swing DIY tutorial

Homemade Taco Swing: What You'll Need

Here's what we used to make this gorgeous DIY sensory swing:

  • 1.7 metres (1.9 yards) of canvas or other non-stretchy fabric - I found this beautiful striped fabric on clearance and paid $10. I did not end up using all of the fabric so I will save the huge scraps for another project!
  • 1" thick wooden dowels - We used two that were 36" long and paid $5 in total from Michaels using two 50% off coupons. More details to follow.
  • Carabiner hooks - We used ones that could hold 100+ lbs each. I think we paid around $8 for two hooks.
  • Drill with 1/4" drill bit

A homemade taco swing for kids

Some Special Tips & Notes About Making this Taco Swing for Cheap!

We went fabric hunting as a family hoping to find a perfect fabric for our swing on clearance. We lucked out and bought some pretty striped fabric. And it's not even hideous fabric or a plain boring color!

However, if you can't find any fabric you like to fit your budget, then why not try using canvas drop cloth as an alternative. It's 100% canvas and is fairly cheap to buy. It was going to be our back-up plan until I found the striped fabric.

When I originally priced out wooden dowels at Rona, it was going to cost me $20 just for that part... 

Well, enter the ever-brilliant husband: "Does Michaels carry wooden dowels?" I knew that I had seen them before, but I had never looked closely at them. 

The answer is yes! 

Michaels had 1" wooden dowels precut to 36" long. And to make things even sweeter, their coupon for the week was 50% off an original price item. So we ended up buying our wooden dowels for $5, plus we didn't have to worry about cutting them!

Okay, okay, now that I shared some of our tips for making this taco swing, it's time to move on to the tutorial, right?
Colorful taco swing for kids + tutorial so you can make your own

How to Make a DIY Taco Sensory Swing

1. Our dowels were much shorter than the width of our fabric. So I cut the fabric to be about 40" wide, just slightly larger than the length of the dowels (36").

2. Fold the edge of the fabric along the long side of the fabric and tuck the raw edge inside. You'll likely use about 2"-2.5" worth of fabric for this hem. Pin and sew. This edge will be the front (or back) of the swing.

3. Repeat on the other long edge, making sure that the finished rectangle is shorter than the length of the dowel.

4. Now we need to make pockets for the wooden dowels. Fold the fabric around the wooden dowel, tucking the raw edge inside, to create the pocket. Don't make the pocket too tight! Pin into place. Remove the wooden dowel. Then sew.

5. Repeat step four on the remaining edge of the fabric.

6. Drill two holes in each wooden dowel, about 1" in from each end.

7. Determine the length of rope you will need. This step depends on the height of your space. Our swing hangs in an extra-wide doorway so we used about 70" of rope per side. You will use one solid piece of rope per side.

8. Put a piece of tape on the end of a piece of rope. It makes threading the rope so much easier! Plus it keeps the rope from fraying. Tie a knot or two on the underside of the dowel. Repeat for all four holes. See picture below.

How to make a taco swing for kids

9. To attach the carabiner hook, locate the middle of the rope for each side. Loop the rope around the carabiner hook. See picture below.

How to make a taco swing for kids

10. Now that the swing is assembled, you will need to install some hardware to hook the swing onto (if you don't already have a swing set-up in your house). You can get a better view of our swing hooks here. We use two eye bolts (about 18" apart) screwed into the frame of a large doorway. Swing hooks should always be installed into a ceiling joist or door frame.

11. Test it out! Before I ever put my own children in a homemade swing, I always test the weight limit myself. The swing held me comfortably. I also had my husband try it out, but he was definitely just too much for our swing to hold. He's roughly 175 lbs.

Storing & Playing with the DIY Taco Sensory Swing

The wooden dowels make it easy to store the finished swing. Simply roll it all up around the wooden dowels and voila!

Storing a taco swing

But more importantly, it works amazing! You can fly it in by laying on your tummy.

Swinging in a homemade sensory swing

Or you can encourage a good core workout and balance by standing in the swing. This type of play is better for older kids.

Swinging in a homemade sensory swing

Our favorite way to play is to swing while laying on the tummy, picking up toys, and throwing them at a target. It usually results in the most giggles too!

Swinging in a homemade sensory swing

Other DIY Sensory Swings You'll Love

DIY Woven Wrap Sensory Swing


Continue reading "How to Make a Homemade Taco Swing"

June 25, 2020

How to Make a DIY Sensory Tunnel

A simple sensory tunnel DIY tutorial. Below you'll find out how to make your own homemade sensory resistance tunnel out of lycra or spandex.

I have always wanted to sew a sensory tunnel since they are so expensive, especially when you consider the fact that they are just a piece of stretchy fabric.

So me being me (and frugal as can be!), I made mine (as well as the two stretchy resistance bands) for only $25. 

Another bonus of making a sensory tunnel myself? I could make it any color I wanted. Or rather any color the kids wanted. Okay, let's be honest, any color that was on the clearance racks haha

But seriously, even if you don't think you can sew, you can easily managing making this DIY sensory tunnel.

Sensory tunnel autism hack with full tutorial

DIY Autism Sensory Tunnel: What You'll Need

To make a homemade sensory resistance tunnel of your own, you will need:

  • Spandex in the color of your choice - 3 meters long (or approximately 3 yards long) - J picked bright yellow, which is fun, but totally hard to photograph as I discovered...
  • Sewing machine
  • Scissors
Crawling through a lycra sensory tunnel

How to Make a Homemade Lycra Sensory Tunnel

The spandex was a bit too wide to make a good sensory resistance tunnel. So I cut the fabric in a way that it ended up being about 45 inches wide. I intentionally made my tunnel a bit roomy so that it would grow with the boys and also fit an exercise ball through.

1. Cut your fabric so that it's about 3 meters long x 45 inches wide.

2. Fold the fabric in half so that it makes a long rectangle (like pictured below).

3. Use a zigzag stitch to sew the ends of the spandex together. Don't forget to backstitch at the start and the finish. Now the sewing part is relatively easy and straightforward, but it is a lot of fabric to get through the machine - just as a FYI.

And that's it! Easy, right?!

Tutorial for making a sensory resistance tunnel

Ways to Use the Homemade Sensory Resistance Tunnel

The best part about this sensory tunnel is that it is versatile. We use it for so many different activities. 

Obviously we use it as a tunnel, like below, but sometimes I get the boys to crawl through the tunnel while pushing an exercise ball. It's a great heavy work activity!

How to make a sensory tunnel DIY tutorial

We also use it like stretchy resistance bands. Simply stand in the middle of the sensory tunnel, grab each end with your hands, and stretch! Here's J demonstrating:

Playing with a homemade sensory tunnel

The sensory tunnel also doubles as a body sock like this sensory sock. Just climb on in and start making shapes.

Using a DIY sensory tunnel as a body sock

Or play peek-a-boo.

Using a DIY sensory tunnel as a body sock

Seriously...how darn cute is this?!

Playing peek-a-boo with a homemade sensory tunnel

K also likes to wrap himself up like a mummy and walk around. Banana man returns (see reference)! And sometimes the boys will climb into different ends to make a double body sock.

Using a homemade sensory tunnel as a body sock

We also use our homemade sensory tunnel as a toy trampoline, which was an idea that I got from the book Motivate to Communicate: 300 Games & Activities for Your Child with Autism. The boys grab some stuffed animals, grab the ends of the tunnel, and shake it like a parachute.

Sensory tunnel tutorial and play ideas

Sensory tunnel tutorial and play ideas

We also like to use it as a sensory swing. My husband and I just grab each end of the tunnel, pick it up, and gently swing it back and forth. Sometimes, if I'm feeling like a good workout, I grab both ends myself so that the boys have to curl their body into a V shape and spin them around for a bit. J particularly loves doing that!

Using a DIY sensory tunnel as a sensory swing

And finally, here are some other suggestions:

  • Play tug of war. Two people grab opposite ends of the sensory tunnel and pull back and forth
  • Create a high jump or limbo bar with it. Two people hold each end, lower and raise it, while encouraging the kids to jump over, crawl under, roll under, etc. It's a great way to work on the words "over" and "under."
  • If you have a smooth soft surface like some tumbling gymnastic mats, then you can have your child climb into the sensory tunnel or lay on top, then pull them across the mats. It's sort of like riding a magic carpet!

Other DIY Sensory Tools & Hacks You'll Love


Homemade sensory tunnel - a simple DIY tutorial for how to make your own out of lycra
Continue reading "How to Make a DIY Sensory Tunnel"

August 16, 2019

How to Make a DIY Lycra Sensory Bed Sheet

Lycra sensory sheets are super easy to make. Use this tutorial to learn how to make your own DIY compression bed sheet for cheap!

I had been debating for months whether or not to sew a weighted blanket for my son before deciding to try making my own sensory bed sheets. I mean one look at the DIY weighted blanket tutorials and I'm like heck no, too much work. Plus, polyfill pellets are expensive!

So me being me, I figured that I could make one for super cheap.

And I did (obviously).

However, before I splurged on some fabric for making some a homemade compression sheet, I wanted to make sure my son would actually like the idea of it. I took our homemade sensory tunnel, which just happens to be the same length required to wrap around my son's mattress, and tried it as a temporary sensory sheet. It worked really great!

So I decided that it was worth making a trip to the fabric store and finally making a legit DIY lycra sensory bed sheet for him.

DIY compression sheet: how to make a lycra bed sheet for kids with autism or sensory processing disorder

About this Homemade Lycra Compression Sheet for Kids

The inspiration for this project is this stretchy lycra sheet that costs $70! Geez, that's a lot of money, isn't it?

Thankfully, my final price tag was $15.

Yes, FIFTEEN dollars.

Much better price, right?

How to Make the DIY Sensory Sheet

First, I measured the entire dimension of my son's mattress, top, bottom, and sides included (it was 120 inches). Then I converted it to metres so that I knew how much fabric to purchase. I needed the exact same amount of fabric that I used to make our sensory tunnel: 3 metres (which is about 3.3 yards). 

However, in the end I had to cut off about a foot to a foot and a half off to make it tight enough to provide good sensory input to my son. 

So K and I headed to the fabric store to look for something in the clearance section. 

I was looking for stretchy and cheap. I didn't care what color it was as long as the price was right. It also didn't have to be lycra as any stretchy fabric would work. 

I ended up searching and searching and finally found this peach cotton spandex blend for 70% off. So I paid $15 for 3 metres of fabric and I was happy as a...wait for it...yes, as happy as a peach.

At first I thought the color was hideous, but it's kind of grown on me, to be honest.

How to Sew Your Own Lycra Compression Bed Sheet

To sew the stretchy sheet, it's just like sewing the sensory tunnel or stretchy resistance bands

Simply take the two ends of the fabric and zig zag stitch them together to create a giant sleeve. 

Yep, that's seriously it! 

Remember, you can use any kind of lycra or spandex material for this project as long as it's nice and stretchy.

Homemade DIY stretchy sensory sheets for kids with autism or sensory processing disorder from And Next Comes L

How to Use the DIY Sensory Sheet

Using the DIY sensory sheet is straightforward. Simply slide the stretchy sheet onto the mattress. Nice alliteration there too, eh?

I know it sounds easy, but try putting it on a regular mattress on the bottom of a bunk bed when room is limited...It's a bit challenging, especially if the sensory sheet is snug. You'll work up a sweat and say a few curse worse in the process, I'm sure.

Then climb in underneath for a calming night of sleep! Awww, you can sense it can't you?

Homemade DIY stretchy sensory sheets for kids with autism or sensory processing disorder from And Next Comes L


Homemade DIY stretchy sensory sheets for kids with autism or sensory processing disorder from And Next Comes L

Hope you found this tutorial helpful. I've got tons of other great sensory hacks just like this.

Other Ideas You'll Love


Sensory sheet DIY: how to make a DIY lycra compression bed sheet for kids
Continue reading "How to Make a DIY Lycra Sensory Bed Sheet"

February 15, 2019

How to Make a DIY Weighted Blanket {Sensory Hacks for Kids}

DIY weighted blanket hack and tutorials for how to make a weighted blanket for kids.

The one DIY sensory hack that I have wanted to do for a long time is to sew a weighted blanket for my son with autism. However, I get freaked out just looking at the amount of work involved in making one. They seem like so much work to make, so I must admit, I have been brainstorming an easier way to make one. Yet, I cannot seem to come up with a good solution. At least, not yet.

In the meantime, I thought I'd share some amazing tutorials for making a DIY weighted sensory blanket for kids with autism and/or sensory processing disorder.

Weighted blankets are a great way to provide proprioceptive sensory input to your child. They can help calm your child and even, gasp, help them sleep better!

DIY weighted blanket hacks for kids

Tutorials for How to Make a Weighted Blanket for Kids

Buying a weighted blanket is expensive! Thankfully, there's these wonderful tutorials for how to make a weighted blanket for kids with autism and/or sensory processing disorder to help you save you some money!

1. Homemade Weighted Blanket (pictured) from Mama Smiles - This step-by-step tutorial is very detailed!

2. How to Make a Weighted Tie Blanket (pictured) from Parenting Chaos - A nice alternative to sewing an entire weighted blanket from scratch. The kids could even help with the tying.

3. Weighted Blanket with Printable Pattern from Craft Nectar - This tutorial includes a free printable pattern, so you don't have to hover over you computer while you sew. Nice, right?

4. Adjustable Weighted Blanket Tutorial (pictured) from Confessions of a Fabric Addict - Love the idea of an adjustable weighted blanket so that it can grow with your child.

5. Weighted Blanket Tutorial (pictured) from The Squishy Pickles - I love the fabric on this one. Such a bright and colorful weighted blanket for kids!

6. How to Make a DIY Weighted Blanket from I Love My Kids - Another very detailed step-by-step tutorial!

7. How to Make a No Sew Weighted Blanket from Junior *gluten-free* Chefs - Yes, no sewing is required for this weighted blanket!

8. DIY Duct Tape Weighted Blanket with Printable Instructions from Jest Tu Positive - No fabric is involved in this DIY weighted blanket. So grab some rolls of colorful and/or printed duct tape to give this one a try!

9. How to Make a Weighted Blanket (pictured) from Sharing the Weight - I love that this tutorial has a chart of the finished dimensions for different target weights of the blankets.

10. Weighted Blanket Tutorial (pictured) from Dandelion Mama - I love the fabric that was used for this weighted blanket.

11. How to Make a Weighted Blanket Tutorial from East Coast Mama - This one is a really cute dinosaur print!

12. Weighted Blanket Tutorial from Feeding Raya - Another beautiful blanket with a detailed tutorial!

13. DIY Adjustable Weighted Blanket Tutorial from Needles & Bows - Another awesome weighted blanket that's adjustable!

Other Ideas You'll Love

DIY Sensory Hacks for Kids

Sensory Hacks for Small Spaces

DIY Chewelry Sensory Hacks for Kids

DIY weighted blanket hacks for kids
Continue reading "How to Make a DIY Weighted Blanket {Sensory Hacks for Kids}"

February 11, 2019

How to Make a DIY Weighted Vest for Kids {10 Awesome Tutorials}

Tutorials for how to make a DIY weighted vest for kids or a DIY pressure vest for kids. These tutorials would be great to make for a child with autism or sensory issues.

As an alternative to weighted blankets for kids with autism, a weighted vest or pressure vest can be a nice way to give your child some proprioceptive sensory input.

However, just like weighted blankets, the store bought versions of weighted vests can be quite expensive! It doesn't have to be anymore because here are some lovely tutorials for how to make a DIY weighted vest for kids.

I've also included some DIY pressure vest tutorials for kids, which are yet another way to provide proprioceptive sensory input.

DIY weighted vest tutorials

Tutorials for How to Make a DIY Weighted Vest for Kids

Don't want to spend money on an expensive weighted vest for your child? Then these amazing tutorials are for you. And seriously, how cute is that ruffled weighted vest?! Such an adorable and stylish idea for a little girl!

1. Cute DIY Ruffled Weighted Vest Tutorial from Holding Tomorrow - Probably the cutest DIY weighted vest you'll find. Such a brilliant hack idea too!

2. DIY Weighted Vest from Classroom Treasure Hunting - This DIY vest just upcycles a denim vest and looks easy to make.

3. Homemade Weighted Vest from Homeschooling, Autism, & "Stuff" - Turn a thrift store jean jacket into a weighted vest with this easy tutorial.

4. DIY Weighted Vest from I am an Autism Parent - This vest is more obvious and colorful, but a nice alternative to consider.

5. How to Make a Weighted Vest from pocketplatypus - Find out how to turn a fleece vest into a weighted sensory vest with this tutorial.

6. DIY Weighted Sensory Vest from Little Miss Kimberly Ann - Another tutorial using a jean jacket or vest.

7. How to Make a Weighted Sensory Vest from Surviving a Teacher's Salary - This vest is made from scratch, but looks really easy to make.

Tutorials for How to Make a DIY Pressure Vest for Kids

Perhaps you're more interested in a compression or pressure vest? Well, no worries! You won't believe how easy (and how frugal!) making one of these vest can be with these great tutorials.

1. Homemade Pressure Vest from Something Sew Special - This pressure vest looks cozy and fairly straightforward to make.

2. Easy Low Budget DIY Sensory Vest from I Break Crayons - A brilliant and inexpensive pressure vest hack! Definitely want to try this one.

3. DIY Deep Pressure Vest from This I Know - Similar process as the tutorial above.


Other Ideas You'll Love

DIY Sensory Hacks for Kids

DIY Weighted Blanket Tutorials for Kids

Sensory Hacks for Small Spaces

DIY weighted vest tutorials
Continue reading "How to Make a DIY Weighted Vest for Kids {10 Awesome Tutorials}"

September 18, 2017

Homemade Squirtle Costume

This tutorial for making a homemade Squirtle costume for kids is so easy! Your kids will be begging you to make them a Pokemon Halloween costume like this!

Halloween is going to be here before I know it and I'm really hoping my kids will want to wear their homemade Pokemon costumes from last year again. Both boys went as their favorite Pokemon characters. J had his Pikachu costume and K had this adorable homemade Squirtle costume.

How to make a homemade Squirtle Pokemon Halloween costume for kids from And Next Comes L

This post contains affiliate links.

How to Make a Squirtle Halloween Costume

For this costume, I used:

I created a pattern using existing clothes and followed the video tutorial found below to make the Squirtle costume, but thankfully, I already had the Pikachu costume under my belt at this point. Just like the Pikachu costume, I opted for using velcro instead of buttons or snaps and made it generous in size. I also had to wing it to make the yellow body of Squirtle, as well as its shell.


Our Finished Squirtle Costume

This costume turned out so incredibly cute, despite me sewing one of the arms in backwards and having to do copious amounts of seam ripping. Seriously, do not sew a costume at midnight right before Halloween. You will make lots of mistakes! I also ended up making the hood of this costume super huge, but whatever, K loved his finished costume!

For the mouth, nose, and eyebrows, I used a permanent marker to draw them and then sewed over them with black thread.

Cute homemade Pokemon costume for kids - how to make Squirtle from And Next Comes L

Cute homemade Pokemon costume for kids - how to make Squirtle from And Next Comes L

Cute homemade Pokemon costume for kids - how to make Squirtle from And Next Comes L

As for the shell, it is removable and attaches with velcro so that K could wear the costume in his car seat. To make the shell, I cut a large foam pad into an oval and wrapped it in brown fabric, hot gluing it along the edges, being sure to leave a 1" or so overhang to put the white cording. Fun fact, when I purchased the foam pad, K insisted that I buckle it up for safety in the car's passenger seat. So like a good mother does, I made sure the foam pad wore its seatbelt in the car.

I then created the lines on the shell by hot gluing brown ribbon in place. Then I wrapped and hot glued white cord numerous times around the edge of the shell, making sure to burn my fingers with hot glue multiple times along the way.

Homemade Pokemon Halloween costume from And Next Comes L

Homemade Pokemon Halloween costume from And Next Comes L

Overall, the Squirtle costume turned out amazing and was a perfect compliment to J's Pikachu costume.

Other Ideas You'll Love


DIY Pokemon Trainer Belts

How to make a homemade Squirtle Pokemon Halloween costume for kids from And Next Comes L
Continue reading "Homemade Squirtle Costume"

September 14, 2017

Homemade Pikachu Costume

This tutorial for making a DIY Pikachu costume for kids is so easy! Below you'll learn how to make a Pikachu costume that works for any size: baby, toddler, older kids, or yes, even adults!

I remember my mom making almost all of the Halloween costumes that I wore as a kid. It always made me feel incredibly special, knowing that no one else would have a costume like me. 

So even when my boys were babies, I wanted to make homemade costumes for them too. However, I skipped a few years of making them simply because we were given awesome hand-me-down costumes. 

Then last year, the boys requested Pokemon costumes. 

And I don't know about you, but the store bought costumes look so cheap and utterly terrible sometimes. Besides, trying to find specific Pokemon characters, such as Squirtle, which K requested (tutorial here), would prove to be quite difficult. Especially on short notice.

A quick Google and YouTube search lead me to an amazing Pikachu onesie tutorial that I knew would work perfect for making virtually any Pokemon character. So with that inspiration in mind, I dashed to the fabric store to spend a good hour or two perusing and touching all the different fabrics, just hoping to find a decently priced fabric that would work. Fabric is so expensive here in Canada!

Then I found the perfect bright yellow material in the clearance racks and I was officially ready to whip up this homemade Pikachu Halloween costume just days before Halloween. 

And it turned out faaaaaabulous!

Pikachu costume you can actually make

How to Make a Pikachu Costume

For this costume, I used:

  • Yellow fabric (fleece was too darn expensive!)
  • Brown fabric
  • Velcro
  • Hot glue gun
  • Felt: black, white, and red
  • Elastic (for wrists and ankles)
  • Paper, tape, and pencil to create the patterns
  • Pillow stuffing
I created a pattern using existing clothes and followed the video tutorial found below to make the Pikachu costume. Instead of using buttons or snaps though, I opted for velcro because buttons and snaps can be tricky for J to manipulate.

I also made the costume generous in size for two reasons. One, if I am going to make a costume like this, then I want to get at least a couple of years out of it. Two, we live in Saskatchewan where some Halloweens can be mild and others can require a full snowsuit to be worn underneath. So it's best to be prepared for all weather conditions!


Our Finished Pikachu Costume!

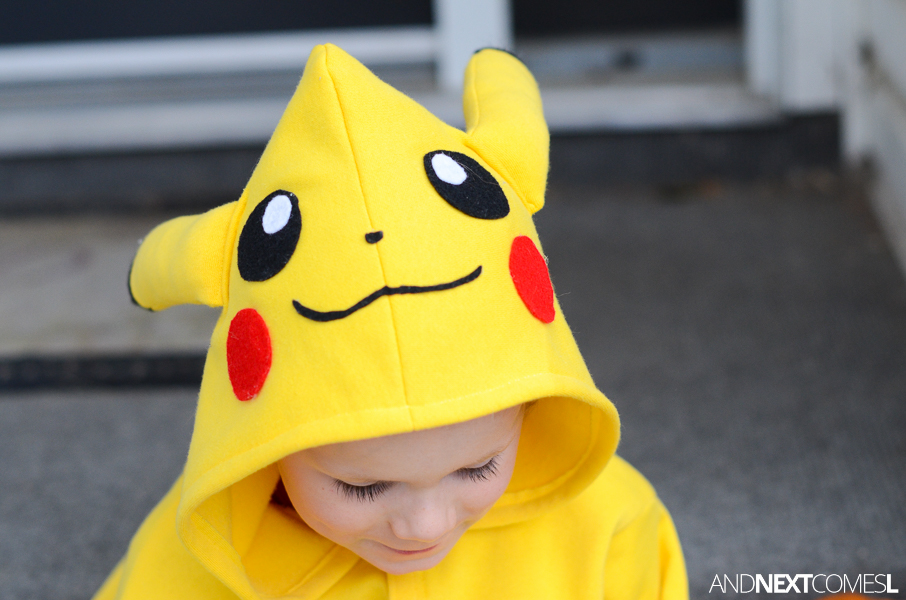
The hood of this Pikachu costume turned out so ridiculously cute! With a little bit of felt and some hot glue, it was easy to put the finishing touches on.

DIY Pikachu costume

Pikachu costume DIY

Most importantly, J thought it was the best costume ever and happily wore it to show off at school. It was also plenty warm with a small jacket and fleece pants underneath to go trick-or-treating in. It also looked fantastic next to our two Pokemon themed jack-o-lanterns, don't you think?

Homemade Pikachu Halloween costume

Another change I made was to make the tail larger. I thought the tail was much too small in the video tutorial. Since the tail was large, it meant it could drag on the ground. So I added some velcro to the tip of the tail so that it could be velcroed up between the shoulders. It also meant I could unvelcro it and J could still sit comfortably and safely in his car seat with the costume on.

Pikachu DIY costume

Other Ideas You'll Love


DIY tutorial for a homemade Pikachu costume that you can make for your kids' Halloween costume this year
Continue reading "Homemade Pikachu Costume"